Mini house demo time

Flipping my mini house

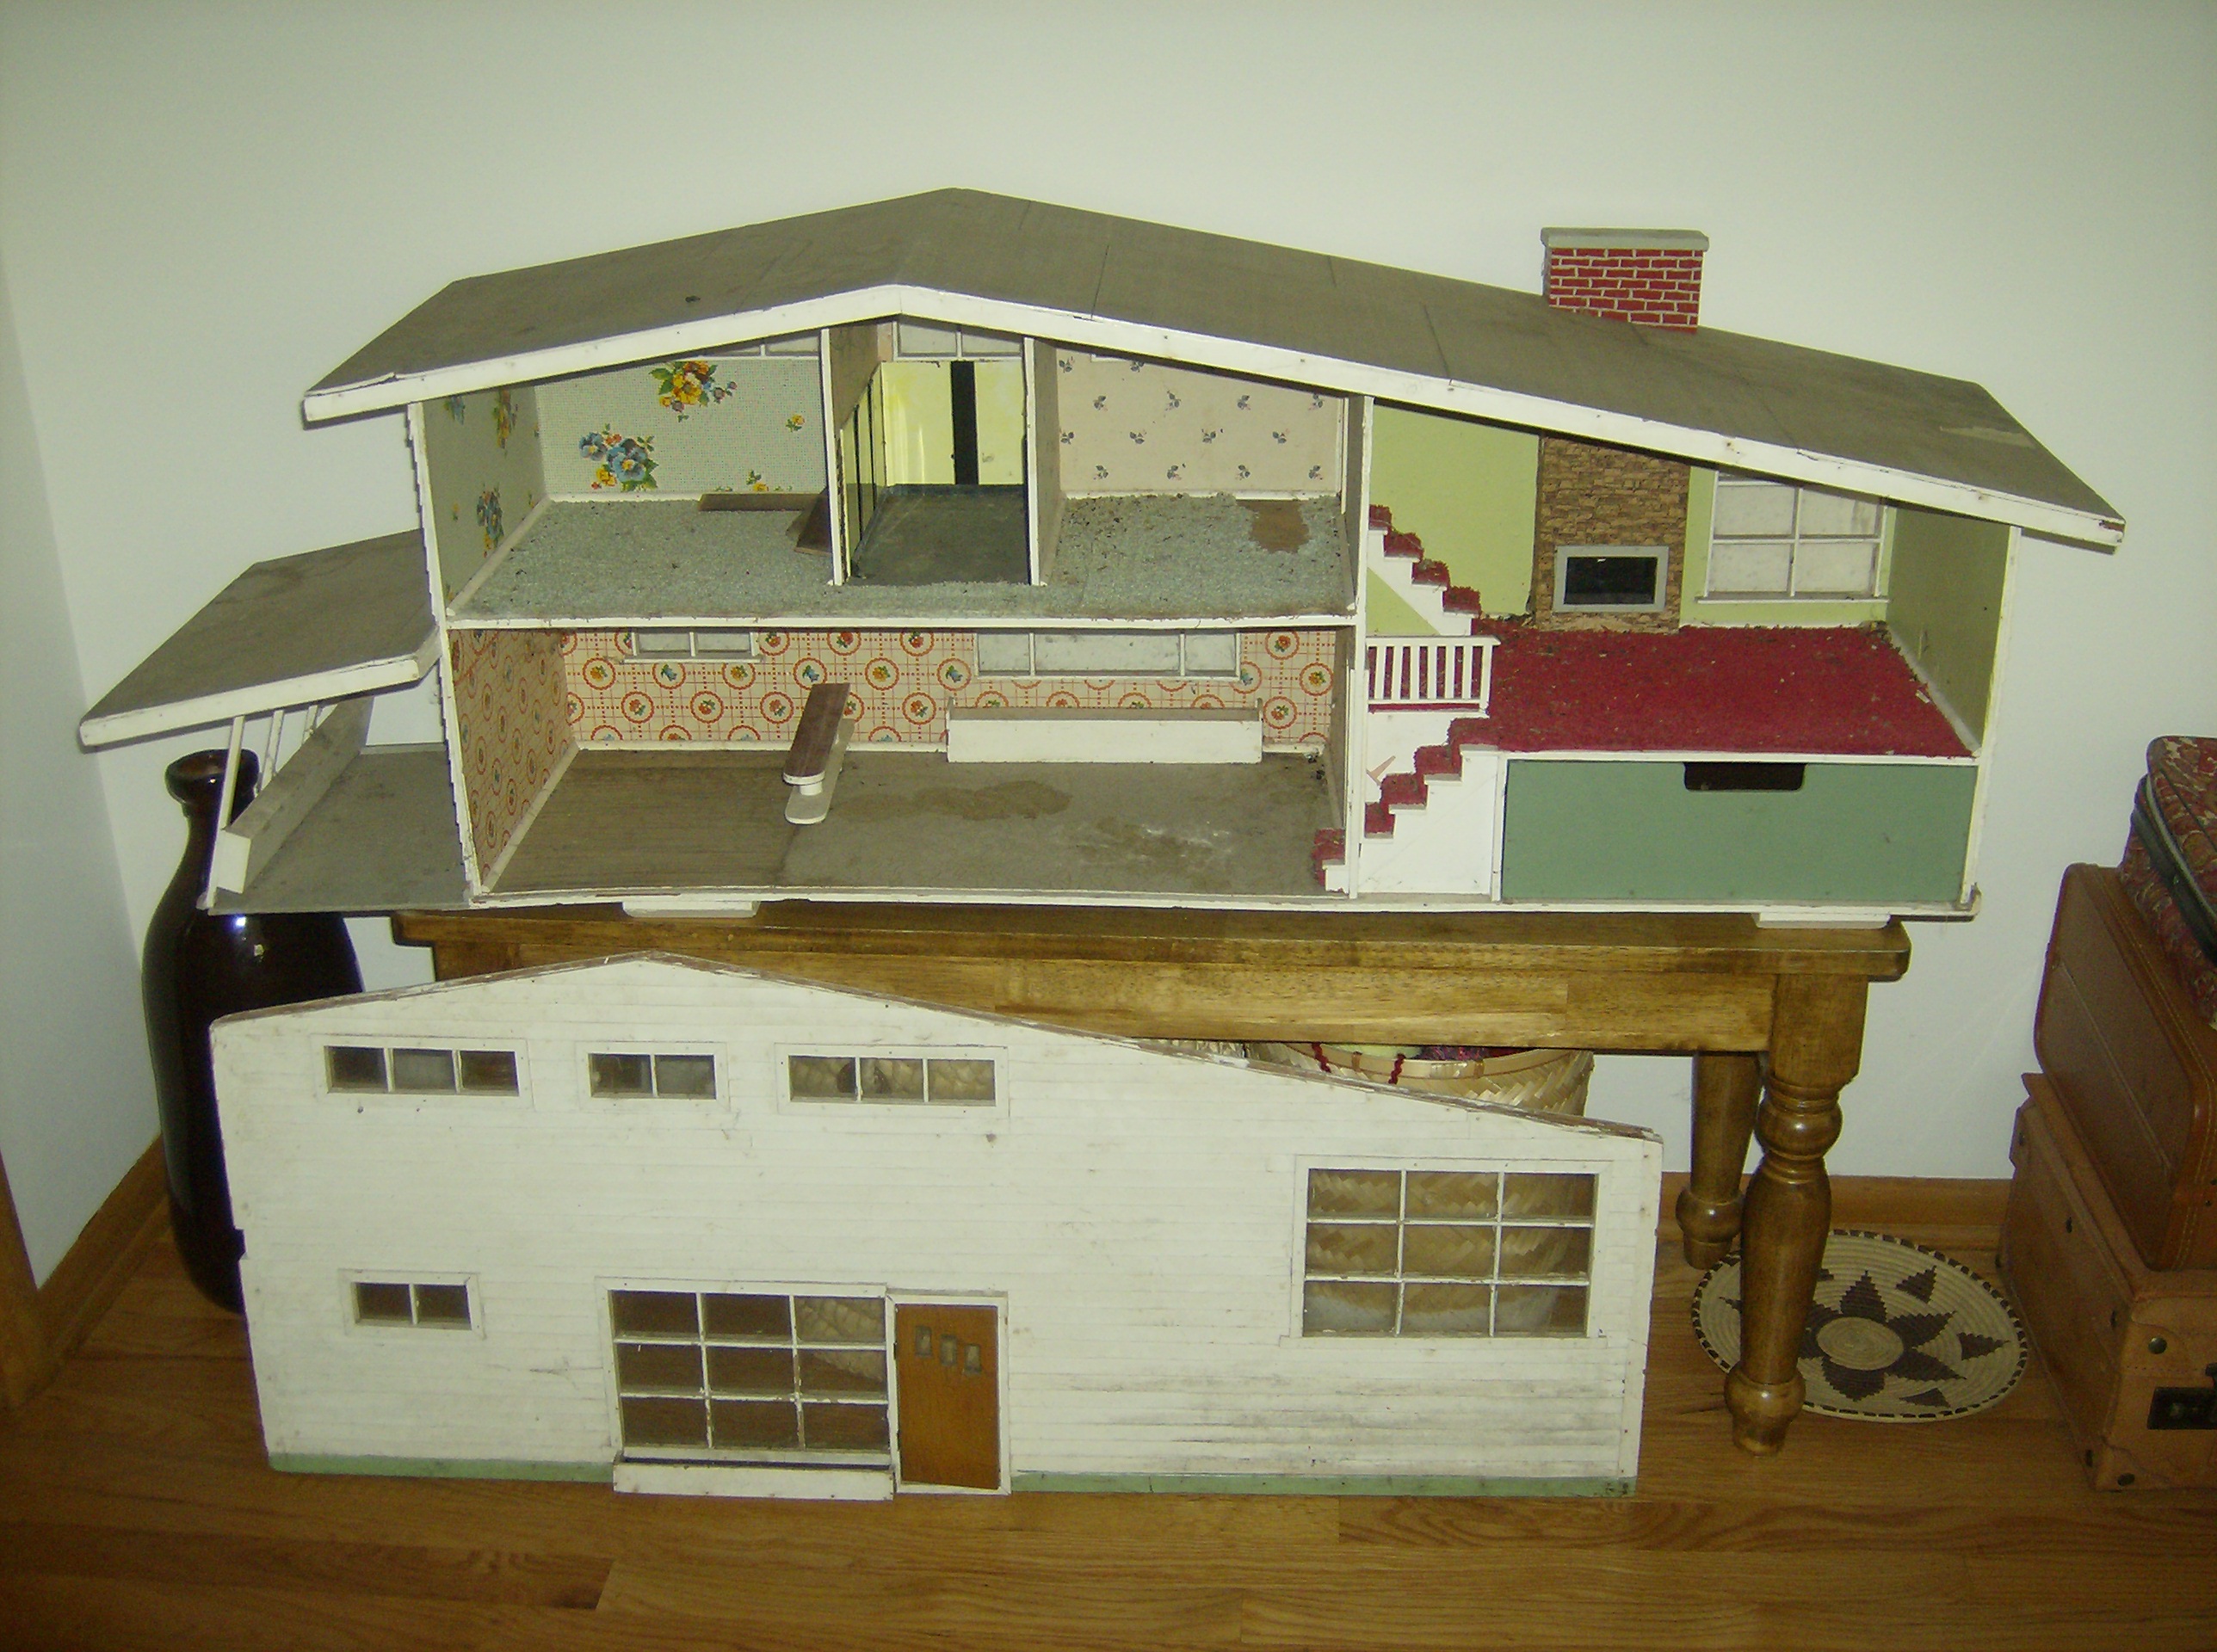
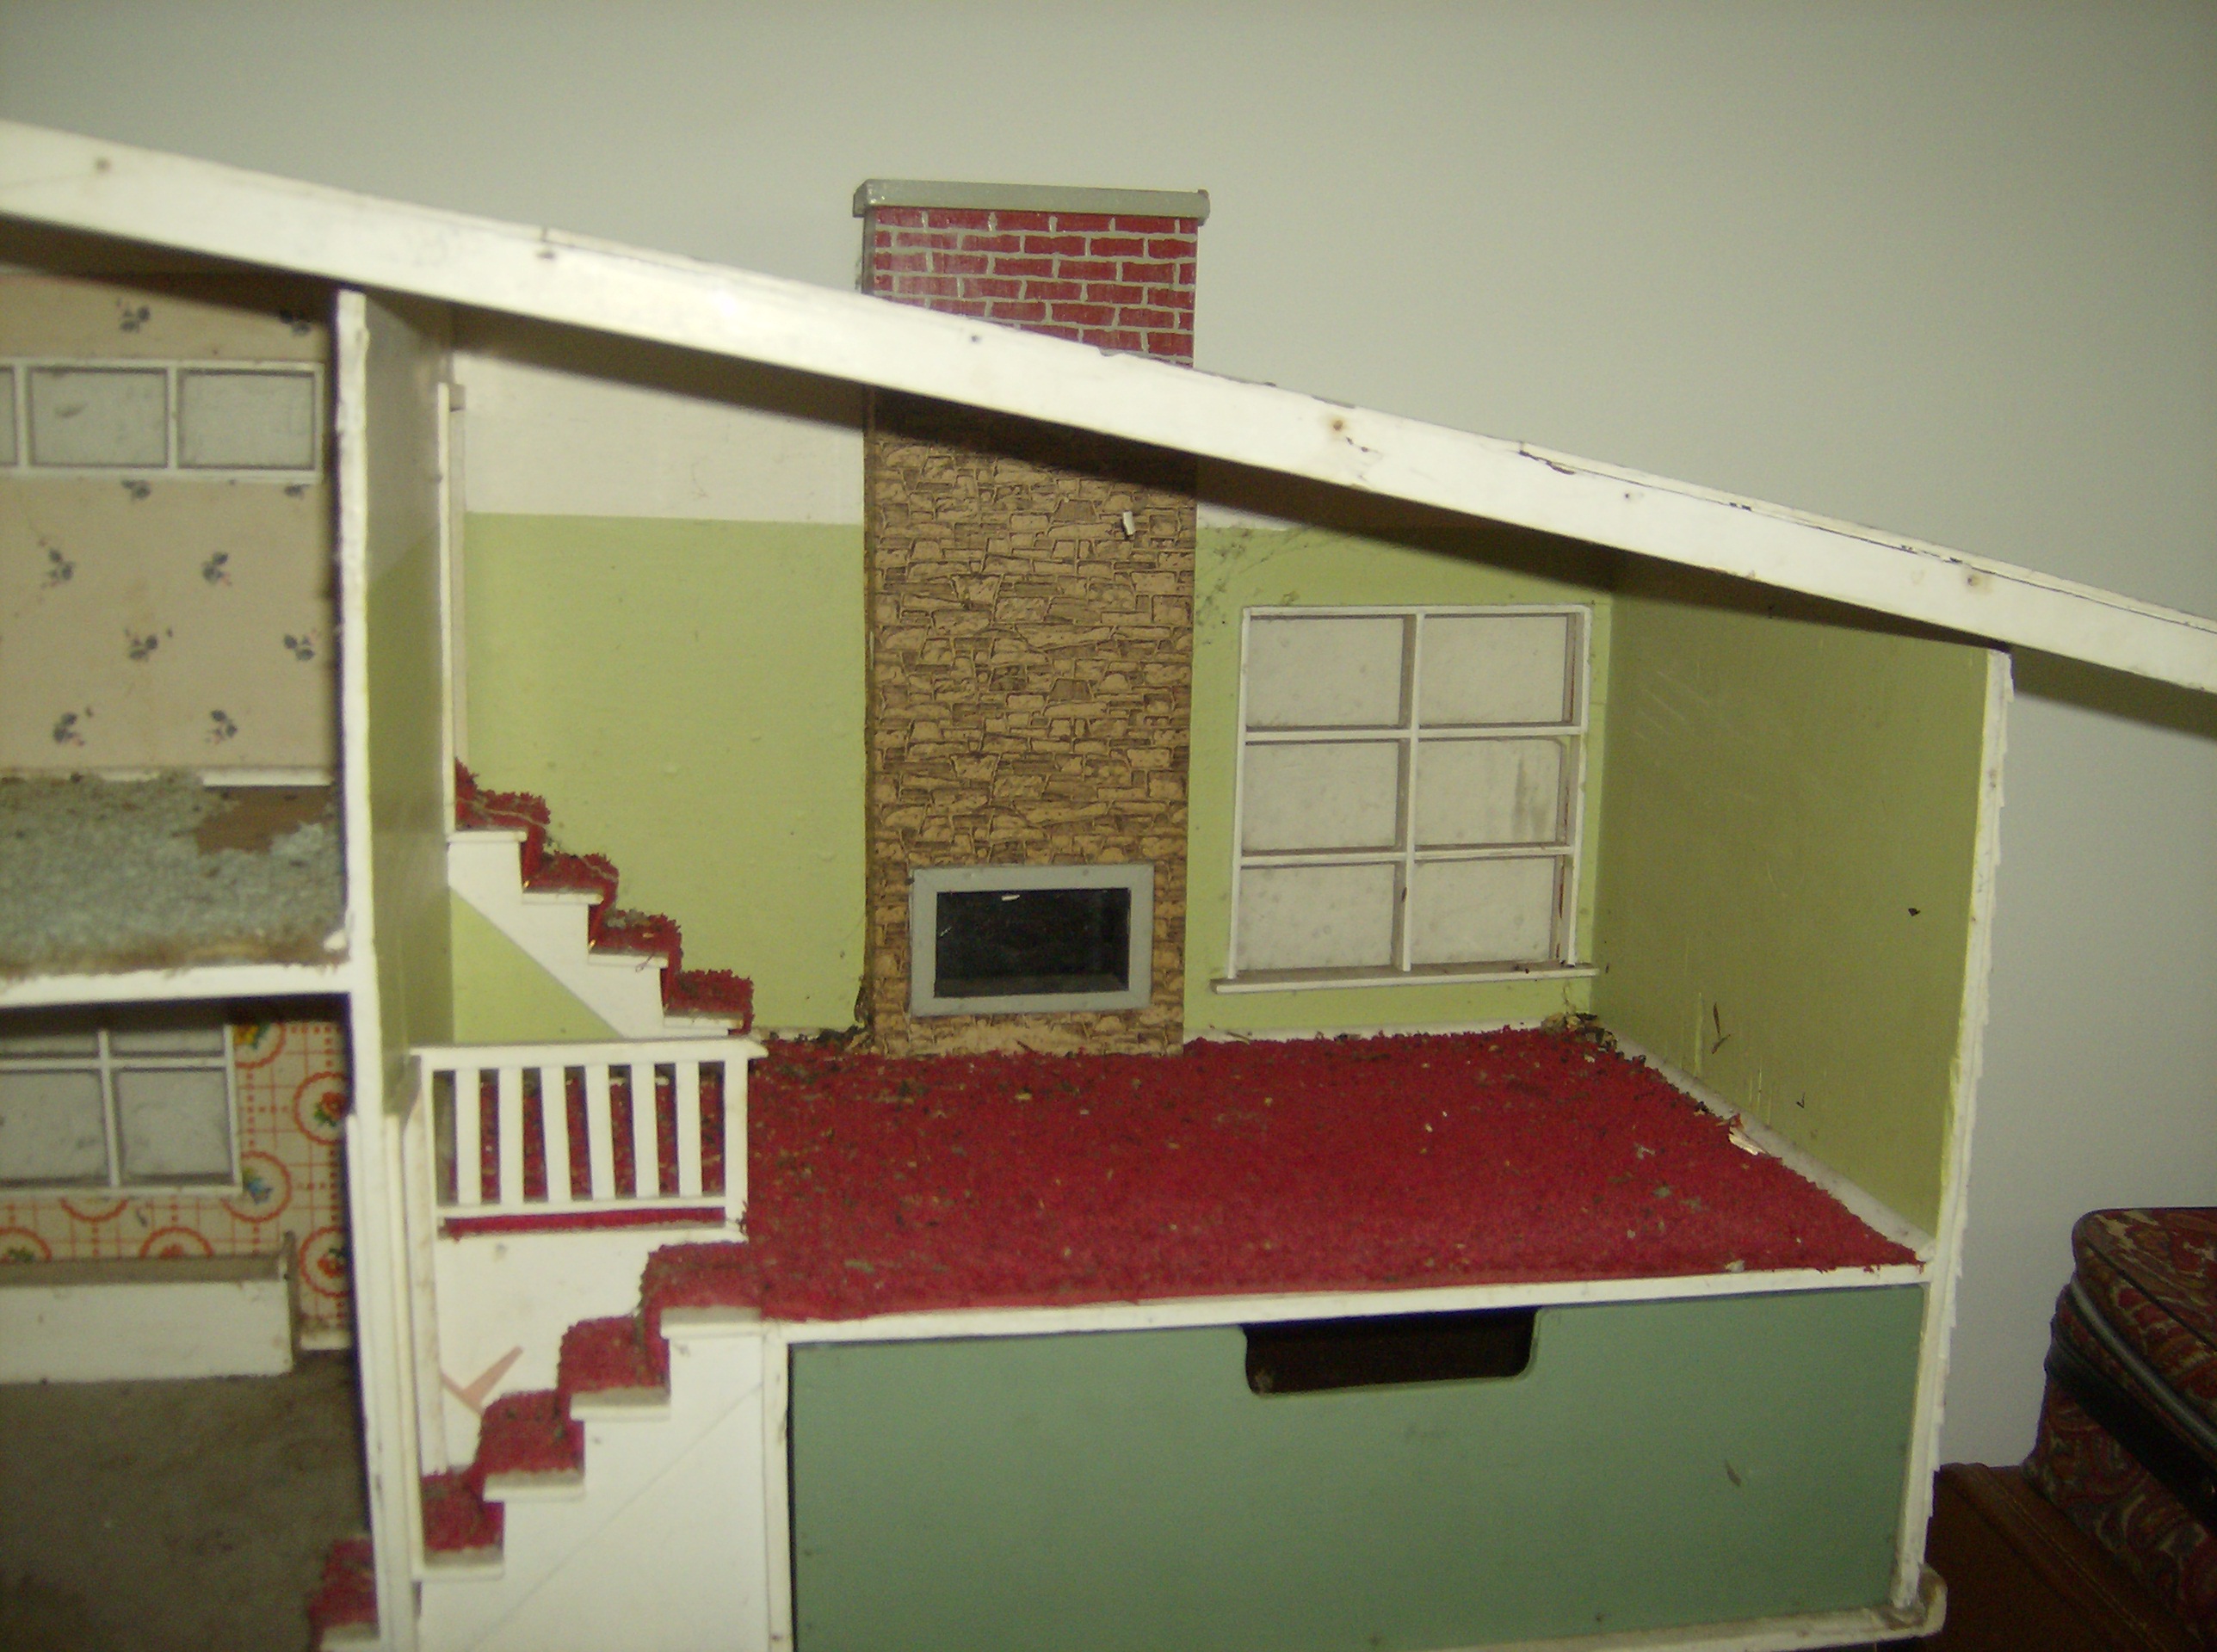
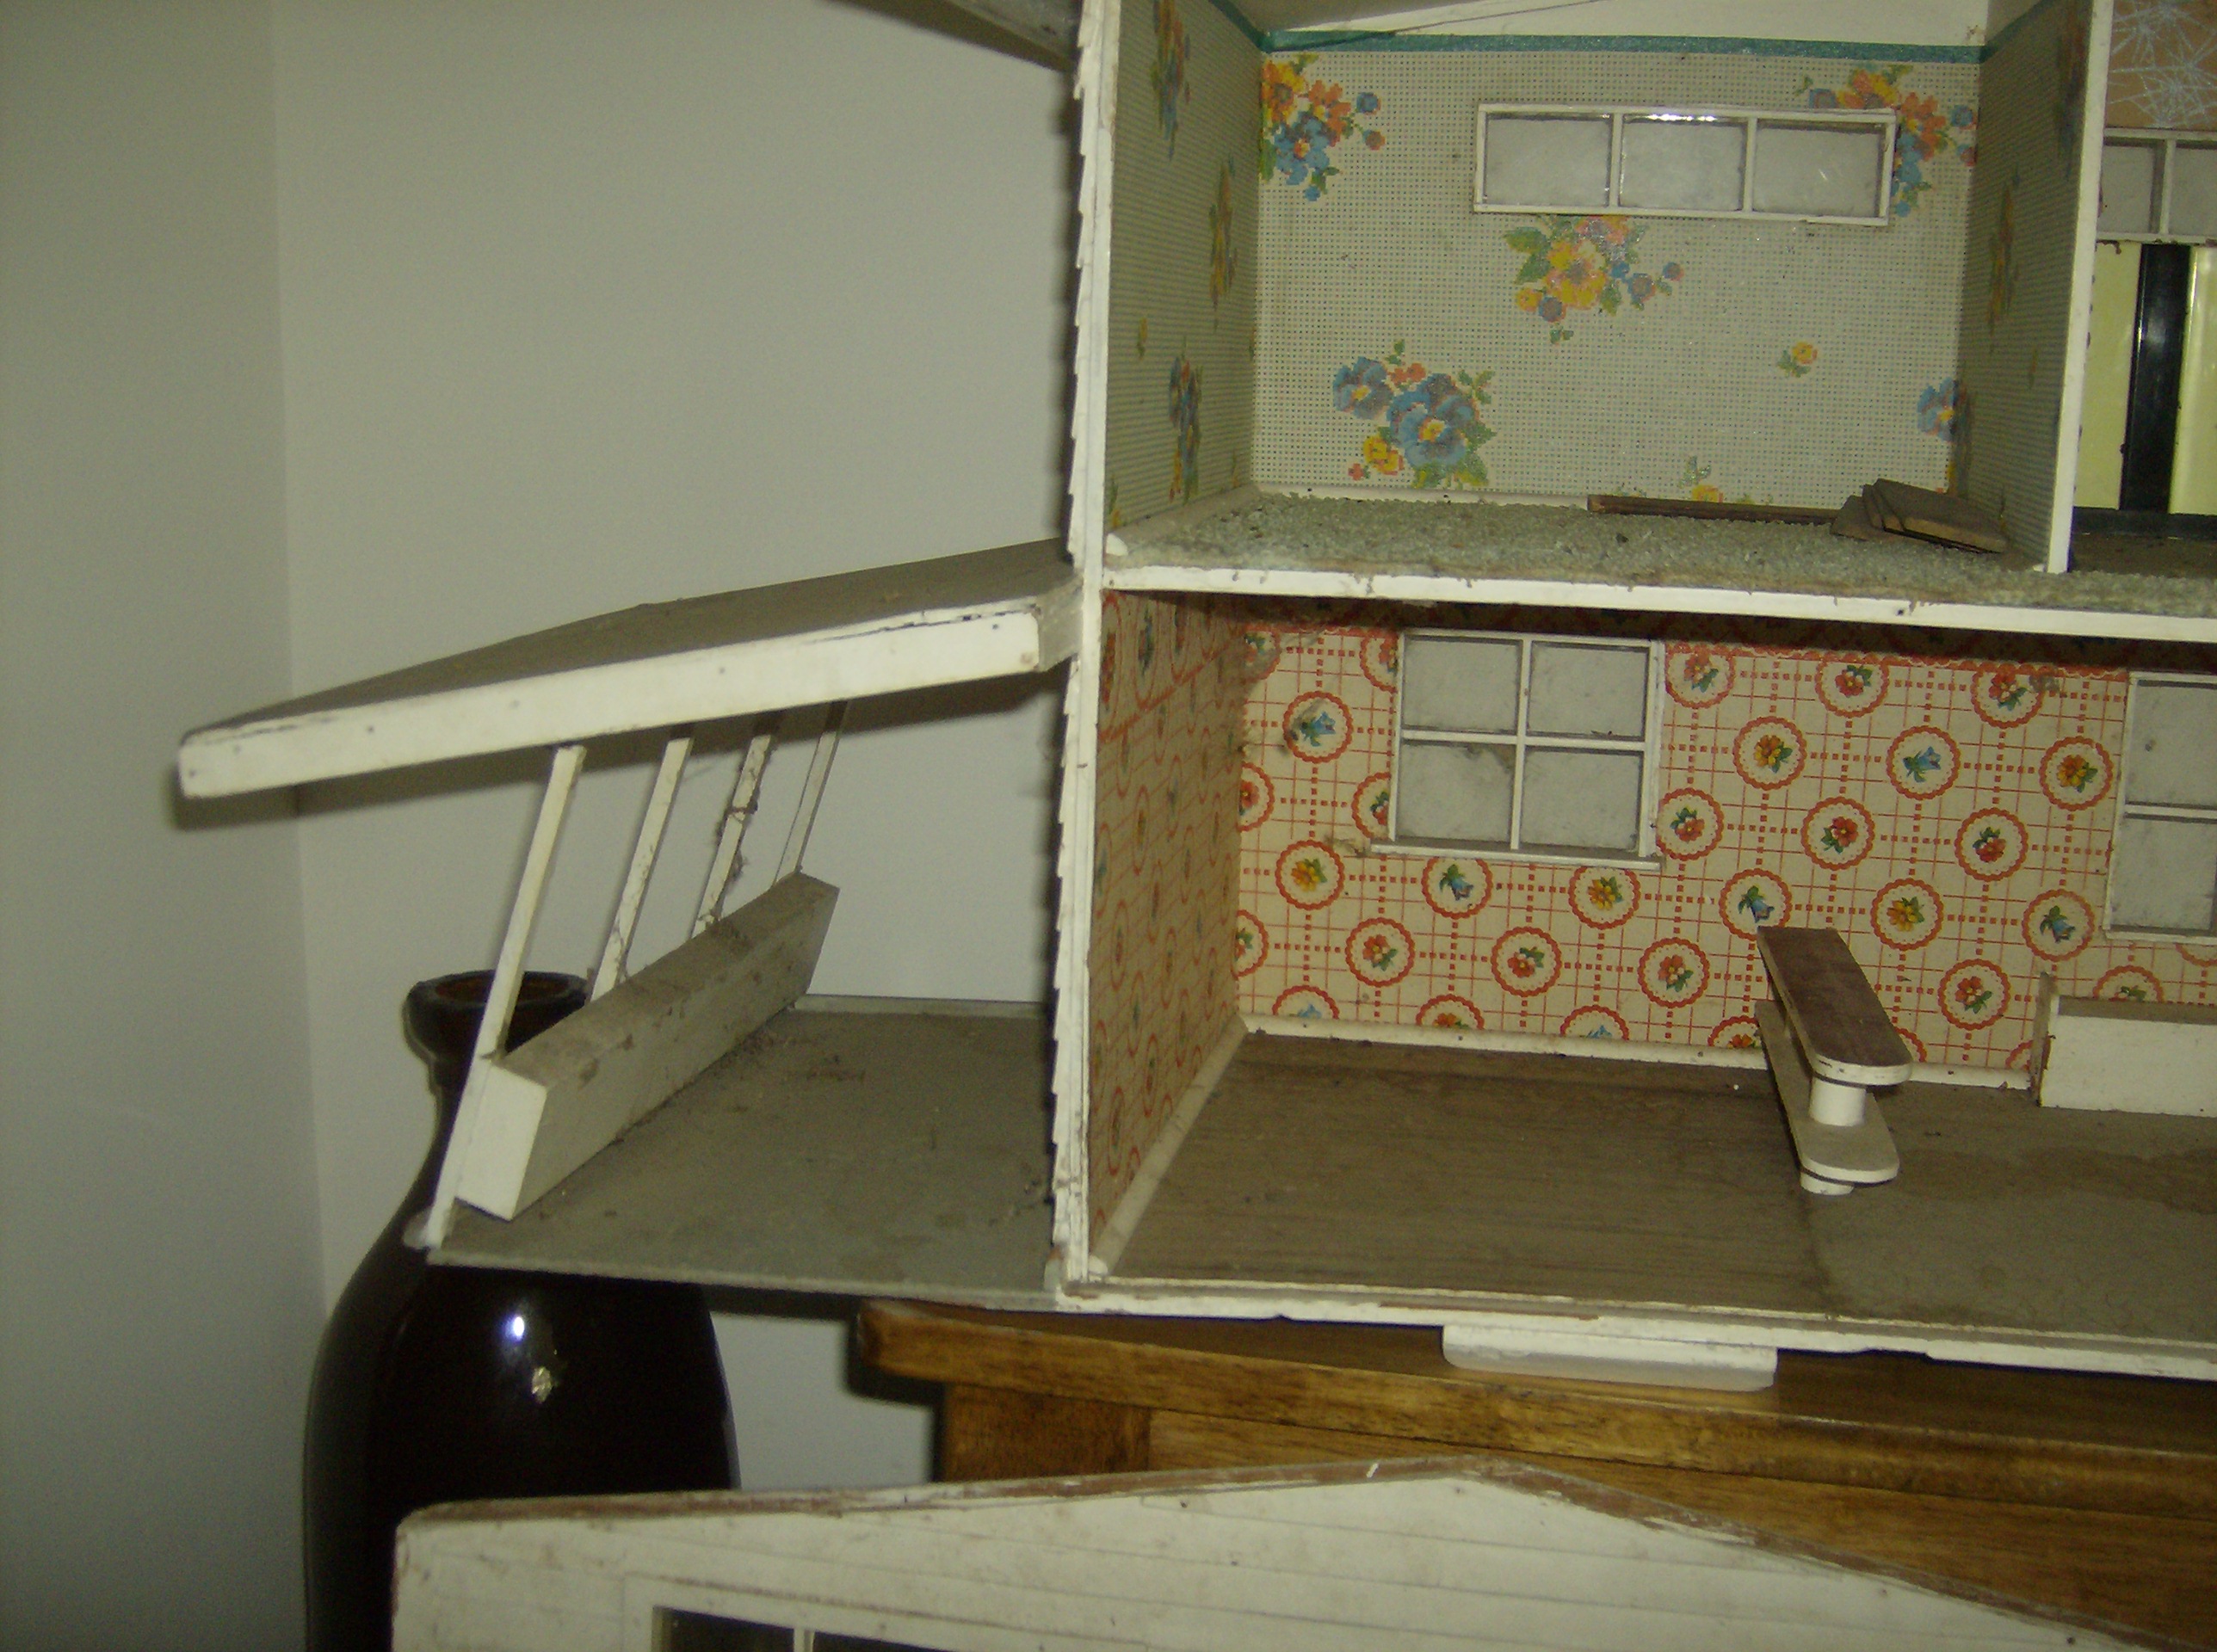
The tiny sledgehammers have been unleashed. I’ve been tearing out wallpaper, removing tiles, and prying away miniature baseboards. Here’s an in-progress view of the work zone. I’ll admit, a part of me thought it was ironic/stupid to remove actual mid century features like the wallpaper, only to replace them with my 2014 ideas of how mid century decor should look. Once I saw the back of the bathroom tiles (is that… rust?) and the wallpaper, all covered in mildew splotches and reeking of yesteryear, I knew I’d made the right decision. I have no idea how I’m going to smooth out the bathroom walls, but I guess I’ll figure out something.


This slideshow requires JavaScript.

Advertisement

Bottle cap turned modern planter or end table

Everyday objects repurposed

This real wooden cap from a bottle of men’s cologne from the 1970’s or 80’s is going to make a great planter or end table. Flipped one way it has a spot for a plant. Flipped the other, it has a smooth table top. Here it is shown beside some books, to give you an idea of the scale. I found it at a thrift store for 90 cents, and it even came in a faux wood grain box (made of cardboard) that might come in handy for another project at some point. The only downfall is the stench of the cologne that I had to endure for the photo shoot.

Groovy pom-pom love sign

Handmade decor for my mini house

Here is an in-progress project:

Pom-pom love sign by Holly Tierney-Bedord. All rights reserved.

Pom-pom love sign by Holly Tierney-Bedord. All rights reserved.

This groovy little pom-pom sign will be a great addition to my mid century house! The tiny pom-poms and backing are available at most crafts stores. It’s easy to sew them onto the backing. You can write or draw your design on ahead of time, or just wing it. Make sure you have enough of each color to complete your shapes or letters. I ran out of light blue on the “e” and had to finish it with white, but I think it turned out pretty cute anyway. This is a quick, simple, inexpensive project. I’m still deciding if I’m going to turn this into a wallhanging or the face of a throw pillow.

Mini woven wallhanging

Handmade decor for my mini house

This simple project required just a mossy twig and some scraps of yarn. I used the arms of a chair as a loom. The entire project only took about a half hour and cost approximately nothing. I think it will end up in the master bedroom of my mid century marvel, since that room is probably going to be green.

Simple woven wallhanging. Photo by Holly Tierney-Bedord. All rights reserved.

Simple woven wallhanging. Photo by Holly Tierney-Bedord. All rights reserved.

Groovy mushroom wallhanging

Handmade decor for my mini house

I want my mid century house to feel homey and authentic, although it will be an updated, 21st century version of how a mid century house would look. This tiny mushroom and butterfly stitching project was created by me, but inspired by other 1960’s and 1970’s patterns I found online. I drew the mushrooms and butterflies on a small piece of cross-stitch backing, filled them in with stitches, added some stitched blades of grass, and finished it off with a wood bead border. The whole project took just a couple of hours, and was mindlessly completed while watching television. If you’re going to watch TV, you might as while create something at the same time.

Groovy mushrooms mini wallhanging. Photo by Holly Tierney-Bedord. All rights reserved.

Groovy mushrooms mini wallhanging. Photo by Holly Tierney-Bedord. All rights reserved.

Measuring cups turned oversized planters

Everyday objects repurposed

Everyday objects around your house can be repurposed in unique ways. I love these West Elm measuring cups I got from a friend, and now I have found a great way to show them off: The bigger measuring cups have joined a stack of small bowls in my (real life, full sized) kitchen, while the two smaller cups have been turned into cute planters for my dollhouse. I paired them with some plastic succulents from the craft store to give them a whole new look. They’ll be cute by the front door, someday in the future when I get to that stage. The best part? This project took approximately 1 second to complete, cost very little, and has no long term effects on the measuring cups, in the event that I change my mind and want to return them to their former measuring cup status.

West Elm measuring cups turned oversized planters. Photo by Holly Tierney-Bedord. All rights reserved.

West Elm measuring cups turned oversized planters. Photo by Holly Tierney-Bedord. All rights reserved.

A mini macrame owl inspired by Jonathan Adler’s design

Handmade decor for my mini house

It’s nowhere near being move-in ready yet, but my mid-century marvel has been accumulating stacks of decor. Some of it I’ve purchased new, some at antique and thrift stores, but most of it I’ve made myself. This miniature macrame owl was inspired by Jonathan Adler’s design book 100 Ways to Happy Chic Your Life. In the book he shows several macrame owls and gives simple, step-by-step instructions to create your own owl. I used his instructions as helpful guidelines, but altered them to work for me. I used thin yarn so it would be the appropriate scale. I added the eyes with slightly darker thread, and I will reattach them once I pick up some thread that’s a match. Up close and with the camera flash the thread is quite noticeable, but until I can replace it, it’s actually not that easy to see in person. I’ve shown the owl with a regular pen so you can get an idea of the scale. Once it’s hanging in the house it will look like a pretty large wallhanging. I think it will end up in the living room, but I am not sure yet. The best part about miniature crafts? They don’t take very long to make!

Photo by Holly Tierney-Bedord. All rights reserved.

Photo by Holly Tierney-Bedord. All rights reserved.

A text message earlier this summer

Flipping my mini house

cropped-marvel1.jpg

My friend and her husband were at a flea market when they spotted two dollhouses. My friend was pretty sure I would find them enchanting so she sent me some texts with photos attached. She was right.

“Buy the Brady Bunch one and I’ll pay you back!” I told her. It was just $35!

The next weekend she and her husband delivered it. (How’s that for service?) He didn’t look happy; it is VERY heavy and was covered in spiderwebs, mouse poop, and who knows what else. I, however, was delighted. It was even better than the picture! It might have been dirty, but as they say in real estate talk, It had good bones. Here are some photos from our first day together:

The house that started it all. Very Mid Century. Very Brady Bunch. Click to enlarge. Warning: You might regret looking too close. Photos by Holly Tierney-Bedord." width="300" height="223" /> The house that started it all. Very Mid Century. Very Brady Bunch. Click photos to enlarge. Warning: You might regret looking too close. Photos by Holly Tierney-Bedord.

How my house looked when I first got it. Photos by Holly Tierney-Bedord.

HPIM0357

HPIM0358

HPIM0359

Copyright 2014 by Holly Tierney-Bedord. All rights reserved.